版本号:
Photutils:1.3.0
Astropy:4.0.1
(Astropy现在已经更新到5.0.1了,是笔者当时忘了更新)
在处理变星观测实验数据时,因为笔者和各位组员们实在不想手动用iraf处理四十张数据,于是笔者尝试使用pyhton的Photutils包进行自动化测光。Photutils是python的一个开源包,包括了源的自动检测及测光功能。笔者也只是使用了一些基础功能,更多玩法还需进一步探索。
Photutils的tutorial写得挺不错的,值得一读:
Getting Started with Photutils — Photutils 1.3.0
Photutils的官方文档:
Photutils — Photutils 1.3.0
恒星测光的数据处理流程如下:
对图片进行本底扣除与平场校正。
对图片进行天光背景估计,扣除背景影响。
查询目标星附近的参考星,使用IRAFStarFinder对图片进行目标检测,将检测得到的目标与参考星及目标星匹配。
检查参考星的成像质量,剔除由于仪器原因成像未达预期的参考星。
使用1D的moffat函数对目标星进行拟合,得到每张图片对应的半高全宽。
对每张图片进行孔径测光。
绘制光变曲线,通过正弦函数拟合得到光变周期,与查询得到的目标光变周期进行对比。
以下是程序实现(代码不完整,主要是讲解各个功能的实现)。
1. 导入需要的包 首先是基本的包:
1 2 3 4 5 6 7 8 9 10 11 12 13 14 15 16 import numpy as npimport matplotlib.pyplot as pltimport seaborn as snsimport pandas as pdimport requests, math, globfrom datetime import datetimeimport timeimport warningsfrom tqdm import tqdmfrom IPython.display import clear_output from astroquery.simbad import Simbadwarnings.filterwarnings('ignore' ) sns.set (style="darkgrid" , palette="muted" , color_codes=True )
导入astropy中相关的包:
1 2 3 4 5 6 7 8 9 10 11 12 13 14 15 16 from astropy.io import fitsfrom astropy.wcs import WCSfrom astropy.coordinates import SkyCoord,ICRSimport astropy.units as ufrom astropy.stats import SigmaClip,sigma_clipped_statsfrom astropy.modeling import models, fitting
导入photutil中相关的包:
1 2 3 4 5 6 7 8 9 10 11 12 from Photutils.datasets import load_star_imagefrom Photutils import Background2D, MedianBackgroundfrom Photutils.detection import DAOStarFinder,IRAFStarFinderfrom Photutils import aperture_photometry, CircularAperture,CircularAnnulus
2. 数据预处理 在处理CCD得到的图像时,需要对数据进行一些改正已尽量减少CCD本身对数据的干扰,最常用的三种改正分别为本底、平场、暗流。
本底 :在零秒曝光下且无信号输出时CCD的输出信号。因为CCD中的每一个像元不可能完全一致,在相同条件下,不同像元的初始光子计数值不一定为零,这就对CCD记录的信号产生干扰。在实际操作时,可通过选取最短的曝光时间,关闭镜头盖,拍摄多张照片叠加得到本底。
暗流 :CCD通过光电信号进行数据读取,但因为电子自身有随机运动,在无光信号时CCD的感光部分也会输出电子。且温度越高,电子运动越剧烈,暗流起伏越大。因此在实际操作中可通过选取与拍摄天体时相同的曝光时间,关闭镜头盖曝光多张照片进行叠加得到暗流。因为拍摄过程中CCD制冷后温度较低,暗流影响比较小,在本次数据处理中忽略了暗流的影响。
平场 :CCD的各个像元在面对均匀光源面输出时,因为灵敏度不一致,输出的光点信号会有差别。在实际操作中我们会让CCD拍摄被白炽灯均匀照射的白布、黄昏或者早晨的天光背景,经过多张叠加后获得平场。
进行数据处理时,笔者将拍摄得到的本底与平场求平均,按以下公式对原始数据进行处理:
参考资料:Flat-field correction - Wikipedia
3. 天光背景扣除 因为Photutils采用了自动检测星点的方法,需要在检测前扣除数据的背景天光,所以要首先对数据进行了全局的天光背景估计。
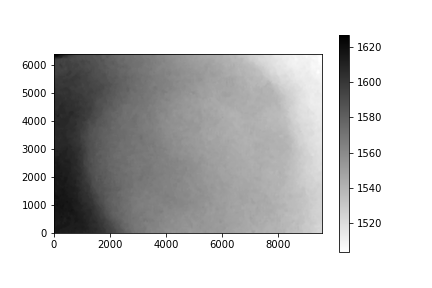
最简单的天光估计方法是计算整张图片的中位数作为估计值,但得到的结果未达预期,所以笔者采用了更复杂的方法:先通过高斯拟合将图片中可能的源去除,将图片按一定大小分割,估算每个小格天光背景的中位数与方均根,从而得到图片全局的天光背景估计。下图是某一张图片的天光背景估计值:
图1-1 天光背景全局估计示例
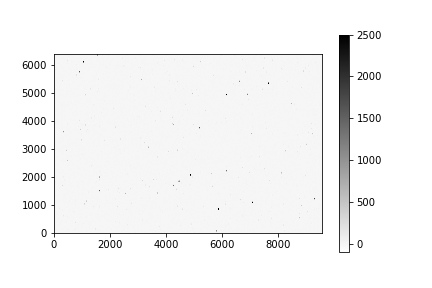
可以看到,即使做了平场校正,图片中仍有暗角留下的痕迹,而且图片中的天光背景不是均匀分布,而是右边较亮,左边稍暗。通过这一处理我们可以把以上两个干扰因素排除。下图是扣除天光背景前与扣除天光背景后的图像对比:
图1-2 天光背景扣除效果展示
以下为程序实现:
1
2
3
4
5
6
7
8
9
10
11
def background_gloabal_sub (data ): sigma_clip = SigmaClip(sigma=3. ) bkg_estimator = MedianBackground() bkg = Background2D(data=data, box_size=(50 , 50 ), filter_size=(3 , 3 ), sigma_clip=sigma_clip, bkg_estimator=bkg_estimator) background = bkg.background std = bkg.background_rms_median return data - background, std
该函数可输出扣除天光背景后的数据。
4. 参考星查询 考虑到不同照片拍摄时所处的大气环境不同,实际得到的流量也不同。为了得到准确的测光结果,在计算目标星星等时需要用其附近已知星等的参考星进行流量校正。以下程序可连接AAVSO数据库查询目标星附近的参考星并获取需要的参数。函数参数中的“field_of_view”单位为角分。
1
2
3
4
5
6
7
8
9
10
11
12
13
14
15
16
17
18
19
20
def get_comp_stars (ra,dec,filter_band='V' ,field_of_view=120 ): result = [] vsp_template = 'https://www.aavso.org/apps/vsp/api/chart/?format=json&fov={}&maglimit=12&ra={}&dec={}' print (vsp_template.format (field_of_view, ra, dec)) r = requests.get(vsp_template.format (field_of_view, ra, dec)) chart_id = r.json()['chartid' ] print ('Downloaded Comparison Star Chart ID {}' .format (chart_id)) for star in r.json()['photometry' ]: comparison = {} comparison['auid' ] = star['auid' ] comparison['ra' ] = star['ra' ] comparison['dec' ] = star['dec' ] for band in star['bands' ]: if band['band' ] == filter_band: comparison['vmag' ] = band['mag' ] comparison['error' ] = band['error' ] result.append(comparison) return result, chart_id
5. 星点自动检测 使用Photutils的IRAFstarfinder可自动检测输入数据中的星点:
1
2
3
4
5
def source_dec (data,std ): fwhm = 4.0 daofind = IRAFStarFinder(fwhm = fwhm, threshold=3. * std) sources = daofind(data) return sources
“fwhm”为星点的半高全宽,“threshold”为在数据的起伏与背景相差多少时可以确定为源,一般取3或5倍天光背景的标准差。
(Photutils还提供DAOStarfinder,笔者没有深究这两种starfinder的区别,只是选用了在本次实验数据上表现更好的那一种。)
接下来是与源检测结果进行对比,找出参考星在我们数据中的位置:
1
2
3
4
5
6
7
8
9
10
11
12
13
14
15
16
17
18
19
20
21
22
23
def comp_stars_match (sources, flag ): astroquery_results = Simbad.query_object(STAR_NAME) TARGET_RA = str (astroquery_results[0 ]['RA' ]) TARGET_DEC = str (astroquery_results[0 ]['DEC' ]).replace('+' ,'' ).replace('-' ,'' ) results, chart_id = get_comp_stars(TARGET_RA, TARGET_DEC) print ('{} comp stars found' .format (len (results))) results.append({'auid' : 'target' , 'ra' : TARGET_RA, 'dec' : TARGET_DEC}) for star in results: star_coord = SkyCoord(star['ra' ],star['dec' ], unit=(u.hourangle, u.deg)) xy = SkyCoord.to_pixel(star_coord, wcs=wcs, origin=1 ) x = xy[0 ].item(0 ) y = xy[1 ].item(0 ) for source in sources: if (source['xcentroid' ]-50 < x < source['xcentroid' ]+50 ) and source['ycentroid' ]-50 < y < source['ycentroid' ]+50 : star['x' ] = x star['y' ] = y star['peak' ] = source['peak' ] results = pd.DataFrame(results) return results
6. PSF拟合得到FWHM 为了得到孔径测光的孔径大小,需要对星点进行PSF拟合得到其更准确的半高全宽,具体流程为选定星点周围10个像素点范围内的点,将其按到中心的距离转化为一维数据,再放入模型中进行拟合,得到FWHM:
1
2
3
4
5
6
7
8
9
10
11
12
13
14
15
16
17
18
19
20
21
22
23
24
25
26
27
28
29
def moffat_fitting (results, data ): isource = results.iloc[1 ] flux_counts = [] pixel_distance = [] analysis_radius = 10 x_cen = int (isource['x' ]) y_cen = int (isource['y' ]) xmin = x_cen - analysis_radius xmax = x_cen + analysis_radius ymin = y_cen - analysis_radius ymax = y_cen + analysis_radius x, y=np.mgrid[:20 , :20 ] for x in range (x_cen - analysis_radius, x_cen + analysis_radius): for y in range (y_cen - analysis_radius, y_cen + analysis_radius): flux_counts.append(((data[y][x]) / isource['peak' ])) pixel_distance.append(np.linalg.norm((isource['x' ] - x, isource['y' ] - y))) model_init = models.Moffat1D(amplitude=1.0 , x_0=0 , gamma=2. , alpha=3.5 ) fitter = fitting.SimplexLSQFitter() fitted_model = fitter(model_init, pixel_distance, flux_counts) return fitted_model.fwhm
笔者也尝试过使用2维Moffat函数拟合,但测光效果不是很好。
7. 孔径测光 在进行孔径测光时,笔者选择了1.5倍FWHM作为孔径半径,天光估计环为内圈半径为2倍FWHM,外圈半径为5倍FWHM。
其中,仪器星等的计算公式为:
而我们根据参考星的V波段星等,可以对目标星进行定标与流量校正,假设各天体仪器测得星等为$M_I$,标准星等为$M$,其计算公式为:
1
2
3
4
5
6
7
8
9
10
11
12
13
14
15
16
17
18
19
20
21
22
23
24
25
26
27
def aperture_p (fwhm,positions,data,results ): aperture_radius =fwhm * 1.5 annuls_r_in = fwhm * 2 annuls_r_out = fwhm * 5 aperture = CircularAperture(positions, r=aperture_radius) annulus_aperture = CircularAnnulus(positions, r_in=annuls_r_in, r_out=annuls_r_out) annulus_masks = annulus_aperture.to_mask(method='center' ) bkg_median = [] for mask in annulus_masks: annulus_data = mask.multiply(data) annulus_data_1d = annulus_data[mask.data > 0 ] _, median_sigclip, _ = sigma_clipped_stats(annulus_data_1d) bkg_median.append(median_sigclip) bkg_median = np.array(bkg_median) phot = aperture_photometry(data, aperture) phot['annulus_median' ] = bkg_median phot['aper_bkg' ] = bkg_median * aperture.area phot['aper_sum_bkgsub' ] = phot['aperture_sum' ] - phot['aper_bkg' ] phot['instrumental_mag' ] = -2.5 * np.log10(phot['aper_sum_bkgsub' ]) phot['vmag' ] = results['vmag' ] target_sub = phot['instrumental_mag' ][1 ] - (phot['instrumental_mag' ][0 ] + phot['instrumental_mag' ][2 ]) / 2 offset0 = phot['instrumental_mag' ][0 ] - phot['vmag' ][0 ] offset1 = phot['instrumental_mag' ][2 ] - phot['vmag' ][2 ] target_mag = phot['instrumental_mag' ][1 ] - (offset0 + offset1)/2 return [target_sub, target_mag, offset0, offset1]
8. 整体实现 1 2 3 4 5 6 7 8 9 10 11 12 13 14 15 16 17 18 19 20 21 22 23 24 25 26 27 28 29 30 31 32 33 34 35 36 37 38 39 40 41 42 43 44 45 46 47 time_fit = [] sub = [] mag_res = [] fwhm_res = [] for i in tqdm(range (1 ,41 )): if i < 10 : with fits.open (IO_data + filename + '0' + str (i) + '.fit' ) as hdul: data = (np.array(hdul[0 ].data) - bia_mean) * np.mean(flat_mean - bia_mean) / (flat_mean - bia_mean) time_fit.append(hdul[0 ].header['DATE-OBS' ][11 :]) header = hdul[0 ].header wcs = WCS(header) hdul.close() else : with fits.open (IO_data + filename + str (i) + '.fit' ) as hdul: data = (np.array(hdul[0 ].data) - bia_mean) * np.mean(flat_mean - bia_mean) / (flat_mean - bia_mean) time_fit.append(hdul[0 ].header['DATE-OBS' ][11 :]) header = hdul[0 ].header wcs = WCS(header) hdul.close() data,std = background_gloabal_sub(data) sources = source_dec(data,std) results = comp_stars_match(sources,i) if (results.isnull().values.any ()==True ): print ("Cannot match the comparision star in fit " ,i) mag_res.append([np.nan,np.nan,np.nan,np.nan]) continue positions = (results.loc[:,'x' :'y' ]) fwhm = moffat_fitting(results, data) if (np.isnan(fwhm)==True ): print ("fwhm nan fit " ,i) mag_res.append([np.nan,np.nan,np.nan,np.nan]) continue print ("fwhm=" ,fwhm) fwhm_res.append(fwhm) mag_res.append(aperture_p(fwhm, positions, data, results)) clear_output()
Author:
Leyao Wei
License:
Copyright (c) 2019 CC-BY-NC-4.0 LICENSE